About the Station Setting Screen: Station Tab
The Station tab is the default tab of the Station Setting screen. You are automatically navigated to the Station tab upon clicking .
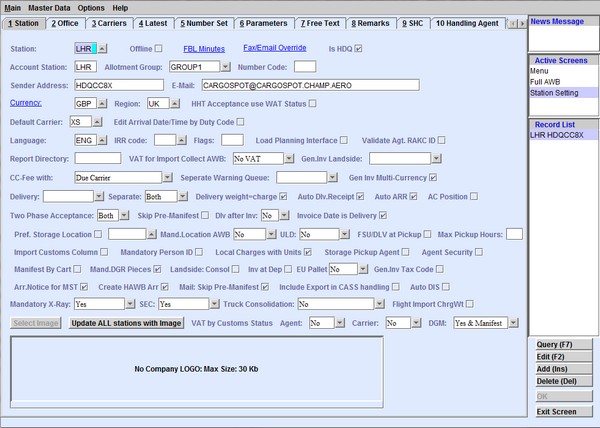
| Field | Description |
|---|---|
| Station | The station code. The station code is taken from the Airport codes set in the
Airport Settings screen. You can look up the available
airport codes from the database by clicking
 , entering search data
in one or more of the fields presented, then clicking Search.
Select the desired code from the search list, then click
Retrieve. The selected code will then populate the
field. , entering search data
in one or more of the fields presented, then clicking Search.
Select the desired code from the search list, then click
Retrieve. The selected code will then populate the
field.Note: Clicking Search when all presented fields are
left blank produces a complete list of all data held.
|
| Offline | By default, stations are online stations. Select the Offline if you are not operating directly in that station but you are selling space out of that station. |
| FBL Minutes | Clicking FBL Minutes navigates you to Station Carrier MSG screen where you can view, create, or modify acceptance rules to prevent FBL load when it arrives too late. |
| Fax/Email Override | Clicking the Fax/Email Override link navigates you to theStation Email/Fax Override screen. |
| Is HDQ | The first station set in the system is marked as HDQ. This is required for
accounting and reporting purposes. Select the Is HDQ check box
if the station is the carrier's headquarters. Note: When the Is
HDQ check box is deselected, the system prompts a warning that an HDQ
station needs to be defined.
|
| Account Station | A station can be linked to one accounting station to allow for centralized accounting. |
| Allotment Group | Allotments can be created for a group of stations if the Allotment Group field is activated in your system. You can activate the Allotment Group field by configuring a group using the Station Allotment Group type in . Existing Groups can be selected from the drop-down list. |
| Number Code | Use this field to give a station a numeric value for interface purposes. |
| Sender Address | The sender address used to send SITA messages. When left blank, the application
uses the default address set in the program.ini file: [sita] defSenderAddress=aaaaaaa The the program.ini file is configured by CHAMP Cargosystems. |
| Enter the email address of the station that is going to be used to send messages. | |
| Currency | The three-letter International Standards Organization (ISO) currency code used by
default in this station. This code is used for accounting and statistical purposes.
You can look up the available currency codes from the database by clicking
By clicking the
hyperlink, the system navigates you to the Currencies
screen., entering search data
in one or more of the fields presented, then clicking Search.
Select the desired code from the search list, then click
Retrieve. The selected code will then populate the
field.Note: Clicking Search when all presented fields are
left blank produces a complete list of all data held.
|
| Region | The region where the station is assigned. Enter the region code as defined in the
Combo Codes screen. You can look up the available region
codes from the database by clicking
, entering search data in one or more of the fields
presented, then clicking Search. Select the desired code from
the search list, then click Retrieve. The selected code will
then populate the field.Note: Clicking Search when all
presented fields are left blank produces a complete list of all data held.
|
| HHT Acceptance use WAT Status | When selected, the system supports warehouse locations that require a breakdown
of export shipments prior to acceptance. Shipments checked in using the Hand-Held Terminal (HHT) can have the status, waiting for total WAT, until all the pieces have been checked in. Once all the pieces have been checked in, the shipment status changes to Accepted goods/docs (ACC) or Accepted goods (ACG). The shipment status is set to ACG if two-phase acceptance is being used and the documents have yet to be captured. |
| Default Carrier | The default carrier for this station. You can look up the available carrier codes
from the database by clicking , entering search data in one or more of the fields
presented, then clicking Search. Select the desired code from
the search list, then click Retrieve. The selected code will
then populate the field. Note: Clicking Search when all
presented fields are left blank produces a complete list of all data held.
|
| Edit Arrival Date/Time by Duty Code | When selected, the access rights for editing the Arrival Date/Time is restricted
to users with the following duty code:
_EDIT_ARR_DATES. Note: This is applicable to the Handling
Module only.
|
| Language | Enter the language code of the language used for certain documents in this
station. You can look up the available language codes from the database by clicking
, entering search
data in one or more of the fields presented, then clicking
Search. Select the desired code from the search list, then
click Retrieve. The selected code will then populate the
field.Note: Clicking Search when all presented fields are
left blank produces a complete list of all data held.
|
| IRR Code | Enter the station IRR code. You can look up the available codes from the database
by clicking ,
entering search data in one or more of the fields presented, then clicking
Search. Select the desired code from the search list, then
click Retrieve. The selected code will then populate the
field. Note: Clicking Search when all presented fields are
left blank produces a complete list of all data held.
|
| Flags | The Flags field is used to indicate a variation in processing customer-specific requirements. |
| Gen.Inv Landside | This field is enabled when using the general invoice module for landside
invoicing. The Storage, Handling, and Local Charges fields used for the default
handling of import related charges on the delivery screen are such cases are
deactivated. Select any of the following from the drop-down list:
|
| Load Planning Interface | Select this check box if the setup has an interface between the application and a load planning tool. |
| Validate Agt. RAKC ID | When selected, the system validates according to the Regulated Agent and Known
Consignor (RAKC) database. Note: This is applicable to the Handling Module
only.
|
| Report Directory | The report directory. You can enter multiple report directories separated by a
semicolon. The system has a specific path for default reports. For example, for a
report at station Frankfurt, the path can be
/custom/resources/reports/FRA. If the report is not found in
the user directory, the system locates it in the standard directory of Cargospot.
In order to have a specific report accessible for several stations, new directories can be created between the USER and STATION directories. The system includes the directories entered in the Report Directory field (separated by a semicolon) to find the matching report. For example: DE;EU. |
| VAT for Import Collect AWB | If applicable, select the appropriate VAT for Import Collect AWB option from the
drop-down list. For shipments flown within the European Union, the applicable VAT
is on the total collect amount. For Non-EU shipments, normally no VAT applies. This
field allows to change this standard way of work for such records in the following
modes:
|
| GSA | Select the General Sales Agent (GSA) check box if the station is going to be managed by a GSA. |
| CC-Fee with | IATA defines the Charges Collection Fee applicable on collect weight and valuation charges, which is the default calculation when this field is left blank. You can select other options from the drop-down list. |
| Separate Warning Queue | The warning list is created by the accounting station. If you want the station to create the warning list separately, you can select which warning lists to create from the drop-down list. |
| Exclude Dest Revenue From Due Carrier |
When selected, Destination Revenue amount is excluded from Due Carrier amount. This
is reflected in the ACC tab of the Full
AWB screen.
Note: This is not applicable to the Handling Module and can
only be set for HDQ stations.
|
| Gen Inv Multi-Currency | When selected, two currencies can be used when creating general invoices. |
| Delivery | This field provides an option to hide the storage or handling field in the delivery screen. |
| Separate | Select any of the following values from the drop-down list.
|
| Delivery weight=charge | Import handling and storage fees are calculated on the gross weight by default. When selected, the chargeable weight is taken as the reference. |
| Auto ARR | It is possible to send an Auto Delivery Receipt to the Agent by email or fax when properly set up in the Forwarder’s record. Select Auto ARR so that the arrival notification is also automatically sent. |
| AC Position | When selected, you can only depart the flight when the ULD Position tab in the Manifested Flight is completed. Indicating the actual loading positions of each unit in the flight is required. If the aircraft type used for the flight has no Loading positions entered, this step is not mandatory. |
| Two Phase Acceptance | The cargo acceptance procedure is normally done in one step, where the data entry
made in the cargo acceptance is accepts the goods and the documents together and the
RCS or RCT message is sent. Two Phase Acceptance enables users to accept the goods
and documents separately.
|
| Skip Pre-Manifest | When selected, users of the handling module for this station can skip the Pre-Manifest and go straight to Load ULD. |
| Dlv after Inv | The delivery of cargo in some stations is only possible once an invoice (for walk-in cash clients) or a pro-forma invoice (for credit clients with periodical billing) has been made. When set to Yes, physical delivery of the goods is only possible after the invoice or the delivery receipt has been printed. |
| Invoice Date is Delivery | By default, the invoice date used in an invoice is the current date. Select this check box if the invoice date is the actual delivery date of the shipment. |
| Pref. Storage Location | When selected, this station is the preferred storage location. Beside this check box is a field where you can define the preferred location for transit shipments. If a shipment is in transit in a station, the entered default preferred storage location is used in the import acceptance procedure. |
| Mand. Location AWB | Mandatory storage location for the AWB in the Cargo Acceptance screen. |
| Mand. Location ULD | Mandatory storage location for the ULD in the ULD assignment screen. |
| FSU/DLV at Pickup | When selected, the FSU/DLV is sent at the time of pickup and not at the time of completion of the delivery screen with status DLV. |
| Max Pickup Hours | If the Pick-up screen is used, the system checks if the time between the printing of the delivery receipt and the pick-up time is within the hour limit set in this field. |
| Import Customs Column | When selected, the Customs Status column is available in the Import ULD Assignment screen. Normally, the warehouse person does not know the customs status, However, in some exceptions it should be entered also. |
| Mandatory Person ID | When selected, the Person ID field is mandatory in the Pick Up screen. |
| Local Charges with Units | When selected, the Units column in the Local Charges grid of the Delivery screen. |
| Storage Pickup Agent | When selected, the Delivery storage charges are paid by the pickup Agent and not the receiving Agent. |
| Agent Security | When the Agent security box is deselected and the Cargo Acceptance Agent is not a secure Agent, automatically set the block MAN box. |
| Manifest By Cart | When selected, the manifesting of the Bulk is done with Cart Numbers. If a shipment is manifested in the Bulk, it is mandatory to fill a Cart number. This is done in the Load ULD screen by filling a cart number and using the Set option. |
| Mand. DGR Pieces | When selected, the user needs to enter the number of DGR pieces in the Acceptance screen if an AWB contains DGR goods. This is used mainly for invoicing purposes. |
| Landside: Consol | When selected, the application checks if the station does Landside Consolidation. |
| Inv at Dep | When selected, all the Agent level export handling invoices are built upon setting the flight to departed. |
| EU Pallet | Use this field to indicate if EU pallet control is mandatory. Select from the
following options in the drop-down list:
|
| Gen. Inv Tax Code | When selected (for those using the automated handling invoicing), the general
invoice template displays two fields for entering a domestic and international tax
code instead of a choice between on and off. The tax code can be used in the case
where there are multiple tax rates depending on the type of charge. This also enables or a different SAP accounting code to be used depending on the product code. |
| Arr. Notice for MST | When selected, the Arrival Notification for the Arrival record with status MST are printed. |
| Create HAWB Arr | When selected, FFM/FHL triggers the creation of the House AWB arrival/delivery
record. The House Delivery records are only created once the Master DLV exists. If the FHL is received before the FFM, the FFM triggers the creation of these records. If the FFM is received before the FHL (Master DLV is created), the FHL triggers the creation of the records. |
| Mail: Skip Pre-Manifest | When selected, mail traffic is separate from other cargo traffic. This check box needs to be selected if the handling station wants to skip the Pre-Manifest process and make the manifests directly in the Manifest Assignment program. In this case, Mail shipments with ACC status will be also visible in the Manifest Assignment screen. Otherwise, records with ACC status need to be pre-manifested (PRE) before they are visible in the assignment screen. |
| Include Export in CASS Handling | When selected, this indicates that the Export charges for this station are included in the CASS file. |
| Auto DIS | When selected, the Confirm button is available in the DIS View tab. |
| Mandatory X-Ray | Use the drop-down list to define where x-ray is mandatory.
|
| SEC | When selected, the SEC box is mandatory in the Cargo Acceptance Export screen. The SEC box needs to be populated for export shipments (not for transit). |
| Truck Consolidation | When set to any of the Yes options, it is possible to consolidate truck numbers
in Acceptance. This option enables making the Export for just one truck, while
messages are sent to all concerned carriers.
|
| Flight Import ChrgWt | Enables the check in the flight import accept for all AWBs that do not have a charge weight filled. If there are such AWBs, a warning is given but the user can still proceed if the general invoice can be generated. |
| VAT by Customs Status Agent | When this setting is in place, the application uses the AWB customs status of the
Agent to determine if Tax applies to the handling invoice or not.
|
| VAT by Customs Status Carrier | When this setting is in place, the application uses the AWB customs status of the
carrier to determine if Tax applies to the handling invoice or not.
|
| VAT by Customs Status DGM |
The special manifest logic works with a special pop-up screen for DGR if it is a split/part shipment (during the assignment of cargo into a unit). The assigned number of packages for each UN number in a unit will then be automatically ready for the final NOTOC. |
| Select Image | Click Select Image to upload the station logo image file
from your computer. Note: To remove or update the image, Click Edit
(F2) and then right-click on the image. The image quality is dependent
on the size and the format used.
|
| Update ALL stations with Image | Clicking Update ALL stations with Image applies the uploaded image to all stations. |